A piece of wood is a legit useful thing and that’s why we implement a lot of experiments on it. From screwing it to doing gauges in it to making several artifices, wood is great. But it is also fragile to things like screws or drilling because wood tends to split a lot.
Therefore, knowing how to fix split wood from screw is a must if you are a DIYer or work full time with wood-related issues. If you follow some basic rules, you can handle the splitting habit of wood. A little bit of carefulness is also important.
Let’s start the article with some basic knowledge about wood splitting from the screw.
Table of Contents
Why Does Wood Crack When Screwing?
There are different reasons for your wood to split easily. Implying screw is one of the very reasons that your wood gets split. But there are other reasons that embody the cause of splitting your wood. We will be talking about them.
Porous Wood
First of all, wood is hard from afar but it has got pours. Different types of woods have pours in different ranges. Wood that has got more pours is basically more fragile and they easily split away if forcing anything into it.
Driving a screw might seem easy in a piece of wood that has many pours, but the risk of breaking the piece into pieces also increases. On the other hand, woods that have fewer pours require force to drive a screw and chances are less but never none to make the wood split.
One of our articles – How to Preserve Wood Slices with Bark?
Drilling without Pilot Hole
One of the reasons for split wood from the screw is not to drill a pilot hole before driving a screw in a hole. A pilot hole supports the system of nailing or screwing and thus prevents your wood from splitting. Therefore, drilling a pilot hole before and then screwing the wood is a better way to prevent splitting it.
Nailing in the Edges
When you try to make an art piece and drive a screw into the edge of a piece of wood, then splitting occurs in the side of the wood. This happens because the wood fibers hardly stand the pressure of the fastener on the edge. There are some other internal issues too.
As dense wood comes with too much less pours and thicker or more fibers, they also tend to break down easily. Treating them well can only save them from splitting.
Compressing too Hard
One of the reasons for splitting wood is when you compress wood with mindless pressure. Nothing remains the same when you try to squish or press anything without knowing the limitations. Even though wood has a solid surface, its fibers, grains, and inside pours participate unconditionally while you compress on them.
Besides these reasons, there can be other factors too. Choosing the wrong nails or screw, or using the wrong fastener, or not recognizing the wood’s strength are several more reasons for splitting the wood.
Methods to Fix Split Wood from Screw
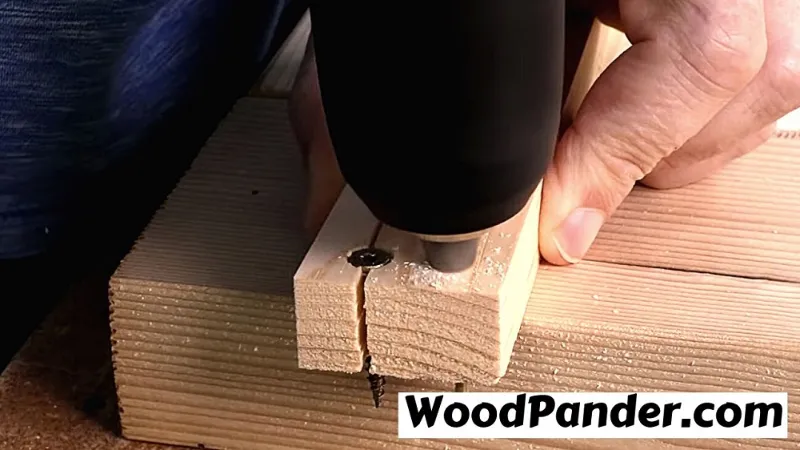
Wood can be repairable. You can restore your split wood by adopting some methods. But the assurance of getting back the old charm of your wood is little. But at least you can make them work and to some extent, they come back in a new design that will surely surprise you. Let’s see how you can join two pieces of broken wood.
Clamping the Split Wood
If you have broken furniture or split wood plank, you can try the method of clamping. It can make the sign of a split disappear to some extent too. You just need to know the right way of doing the job. Clamping split woods require few extra materials. We will tell you the whole process step by step.
Step 1: Bring Your Materials
First thing first, you need some materials alongside the clamp. You can find them in any convenience store. Things that you will need overall are,
- Putty knife
- Clamps
- A quality wood glue
- Sandpaper
Step 2: Inject the Glue
The second step will lead you to glue the split hole in the wood. For this, you need to use a putty knife and stretch out the hole with it as much as possible. Also, be careful that you don’t expand the hole by stretching or prying the hole too much. Examine the hole and then inject quality wood glue into it.
CA glue for wood is renowned for this job. To fill the whole with the right amount of glue, make sure there is a tip in the bottle of the glue. With one hand open up the whole and with the other hand and help of the tip of the glue bottle, fill the entire whole with glue properly.
Step 3: Clamping Time
After you fill the hole with glue, examine with your fingertip that the glue reaches the bottom of the hole. Then bring clamps and perpendicularly set the clamps every 3 or 6, if the hole is bigger, inches away from each otheracross the wood.
Make sure you place the clamps evenly by giving even space between each of them. Now it’s time for showing some labor power, as you have to tighten the clamps. You need to continue tightening until you notice the glue is coming or oozing out.
Step 4: Let it Dry
After clamping and tightening, let the glue set inside. Wipe out the remaining unnecessary glue from the wood after clamping first. Then you need to keep the whole thing dry for a night or two. When the glue will dry, it will help mend the split of wood to a great extent and make the wood look seamless again.
Step 5: Sand the Area
Hold on because we are not done yet. You need more seamlessness and an even texture on the surface of the wood. That’s why remove the clamps one by one first and then get sandpaper to make the area even. 100-grit sandpaper will do justice to it.
So, sand with the sandpaper properly until you feel the texture is even and then you are done with your job.
Bonus Options: If you are thinking of applying epoxy instead of glue that will also serve better service. It’s because epoxy comes with an extra adherence agent and will hold your broken pieces of wood tightly. This is a very effective method for your split wood cabinet.
See Also How To Preserve Wood Slices For Wedding?
Remove the Screw
It is not easy to remove the screw after it has split your wood. Following some specific procedure is a must here.
Step 1: Run a Glue Accelerator and Glue
Before removing the screw, you need to apply glue and an accelerator on the spot. Mind that the glue should reach every corner and narrow spaces of the split. Use any technique to make the glue reach the narrowest spot of the split area.
Step 2: Remove the Screw and Clamp
Now you can remove the screw. After this job, clamp the split. The glue will be dry after a day and the split will be removed to some extent.
Step 3: Place the Screw again in Its Former Place
You should not remove the clamp yet now that you need to drive the screw again inside the wood. This will help to fix the split wood.
Applying Dowel
This is another method that you can adopt if you see the situation is suitable. Using a dowel to fix split wood from a screw requires a bit of professionalism. However, you can also fix it by being a simple DIYer by providing extra care to the job.
Step 1: Check the Materials
To do the doweling job, you need some basic materials for it and these are
- A piece of dowel
- A screwdriver
- Wood glue/epoxy
- A sanding shim
- Hammer
N.B: Before jumping into the main job, it is a must to fill the split with a filler like glue or epoxy beforehand. The dowel just works as a reinforcement to keep the split wood stable.
Step 2: Make a Pilot Hole
You need to make a pilot hole in this step. For this, bring a sanding shim and place it perpendicularly to the split to make the pilot hole. The hole should be around 3/8 inches. Then you need to clean the dust and debris coming out during the process.
Step 3: Insert the Dowel
Now that you made a proper hole at the proper angle, it’s time you take the dowel in hand. First, apply epoxy on the dowel for better service. And then place it into the hole. Use a hammer for this job. Once it is set inside, you need to clamp the breakage. And then you need to keep it overnight so it becomes dry properly.
Step 4: Smoothen the Area
When it is dried, remove the clamps. Sometimes the dowel does not come with the right size for the hole so you’ve got to cut the extended part. Then sand the area to make the place even. You can also apply any wood satin to make the place more approachable.
This method is effective for furniture that comes with strange shapes like round, rectangular, or square.
Bonus Options:
- You can simply use braces to join the split wood together. These braces are effective and last pretty long.
- Also, applying masking tapes is another efficient method that you can adopt if the situation or split is not so serious.
- Experts also tell us to use a joint compound as it is another kind of wood glue and serves right to the split wood from the screw.
- Then again, shims work pretty well to fix split wood. To fix smaller spaces, using shims is more effective.
- Sawdust Bondo is another typical way to stand bigger areas of split wood. It has healing potentials like epoxy filling.
There can be other many ways to fix your split wood from the screw. But you cannot apply these methods without any concern. You should know how severe the split is and then apply one of these methods concerning the severity. Only then you can get the right result for your deed.
Related Questions
How do you stabilize cracked wood?
Using wood epoxy to stabilize cracked wood has been the most famous method even now. It requires fewer materials, and less labor, and works super satisfyingly to stabilize cracked wood.
What causes wood to split when screwing?
The main cause of wood splitting when screwing is due to improper drilling and fastening techniques.
How can I prevent wood from splitting when screwing?
To prevent wood from splitting when screwing, use the right size and type of screw, drill a pilot hole, and avoid overtightening the screw.
Can split wood be repaired?
Yes, split wood can be repaired using various methods depending on the severity of the split.
What tools and materials do I need to fix split wood from a screw?
You may need a drill, screws, wood glue, clamps, wood filler, sandpaper, and a saw to fix split wood from a screw.
What are the steps for fixing split wood caused by a screw?
The steps for fixing split wood caused by a screw include removing the screw, gluing the split, clamping the wood, filling the gap, sanding the surface, and reattaching the screw.
How long will the repair last?
The repair can last a long time if done properly, but it ultimately depends on the severity of the split and the quality of the repair.
Is it better to replace the wood instead of fixing it?
If the split is severe or affects the structural integrity of the wood, it may be better to replace the wood instead of fixing it.
Can a professional help me fix split wood from a screw?
Yes, a professional carpenter or woodworker can help fix split wood from a screw if you’re unsure of how to do it yourself.
Will fixing split wood affect the structural integrity of the wood?
Properly fixing split wood should not affect the structural integrity of the wood if done correctly.
How can I avoid splitting wood when screwing in the future?
To avoid splitting wood when screwing in the future, use the right size and type of screw, drill a pilot hole, and avoid overtightening the screw.

