Are you having a hard time installing your lag bolts? Even if you can install one, it sometimes happens to not be tightened enough. It might not be able to bear an intense load.
So you may ask, how to install lag bolts into studs properly?
This doesn’t really explain the whole scenario. That’s why we’ve covered a complete guide for installing lag bolts into studs.
So, read along to know more.
How To Install Lag Bolts Into Studs
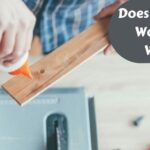
For installing lag bolts, align all the materials that you have to screw together first. After you’ve lined them up, use your clamp for sticking the materials in place.
Then create a hole through those materials where the lag screw will go through drilling. Next, place a nut on the lag screw’s other end. After that, tighten your lag screw properly. Once done with placement, you can remove the clamp.
Why Install Lag Bolts In Studs?
Lag bolts, a heavy screw, come with a square or hexagonal head. These bolts are told to be one of the toughest fasteners.
Because they are mostly used for connecting heavy lumber or other items. So, if you need a heavy load-bearing capacity, lag bolts are a great choice.
Now, lag bolts mainly work in two ways. One is to carry weighty loads by getting planted over materials. Another one is joining two heavy materials together by installing the bolt. Later, screw the bolt with a stud.
First, you need to plant lag bolts to connect two heavy blocks of wood. Afterwards, secure the joint with stud. That’s why we have to connect studs to lag bolts.
Lag bolts offer several advantages when it comes to securing heavy items in studs.
Firstly, their strong and sturdy construction ensures reliable support and prevents any potential accidents.
Secondly, the coarse thread design of lag bolts provides excellent grip, minimizing the risk of loosening over time. This makes them a reliable choice for applications where stability is crucial.
Additionally, the ease of installation and removal makes lag bolts convenient for both temporary and permanent installations.
Whether you’re mounting shelves, cabinets, or other heavy objects, lag bolts in studs provide the strength and security you need.
Disadvantages of Using Lag Bolts in Studs
While lag bolts offer many advantages, there are also a few disadvantages to consider.
Limited Load Capacity: One of the main drawbacks of using lag bolts in studs is their limited load capacity. While they are suitable for securing medium to heavy items, they may not be the best choice for extremely heavy loads. In such cases, it is recommended to use alternative fastening methods or consult a structural engineer for guidance.
Pre-Drilling Required: Unlike some other fasteners, lag bolts require pre-drilling before installation. This can be time-consuming and may require additional tools, such as a drill and drill bit. It is important to ensure that the pre-drilled hole is the correct size and depth to ensure a secure and proper fit.
Potential for Splitting Wood: When installing lag bolts in wooden studs, there is a risk of splitting the wood. This can occur if the hole is not properly aligned or if excessive force is applied during installation. To minimize this risk, it is important to use the correct size of lag bolt and to carefully align the hole with the grain of the wood.
Limited Aesthetic Options: Lag bolts are primarily functional and may not offer a wide range of aesthetic options. They are typically available in standard finishes, such as zinc or galvanized, which may not match the desired aesthetic of the project. In such cases, alternative fasteners or decorative covers can be used to achieve the desired look.
Different Types of Lag Bolts In Studs
There are several different types of lag bolts available, each with its own unique characteristics and applications:
Lag Screws: Lag screws are a common choice for wood-to-wood fastening. They have a pointed tip and a threaded shank that allows them to be easily driven into wood.
Lag Bolts: Lag bolts are designed for heavy-duty applications. They have a thicker shank than lag screws and are typically used with washers to distribute the load evenly.
J-Bolts: J-bolts are used for securing pipes and conduit. They have a curved shape that hooks around the pipe or conduit and a threaded shank that is tightened into a nut.
Selection Criteria for Lag Bolts
When it comes to selecting the right lag bolts for your project, there are several important factors to consider. By taking these criteria into account, you can ensure that you choose the most suitable lag bolts for your specific needs.
Material: The material of the lag bolts is crucial for determining their strength and durability. Common materials include stainless steel, galvanized steel, brass, and black oxide. Consider the environmental conditions and the load-bearing requirements of your project to determine the best material for your lag bolts.
Size: Lag bolts come in various sizes, including diameter and length. The size you choose should be appropriate for the thickness of the materials you are fastening together.
It is essential to select lag bolts that are long enough to penetrate the stud and provide a secure connection.
Thread Type: Lag bolts can have different thread types, such as coarse or fine. Coarse threads are suitable for softwoods and provide better grip, while fine threads are ideal for hardwoods and offer increased holding power.
Head Type: Lag bolts come with different head types, including hex head, round head, and flat head. The head type you choose should be compatible with the tools you have available for installation and the aesthetic requirements of your project.
Load Capacity: Consider the weight and load-bearing requirements of your project to ensure that the lag bolts you choose can handle the expected load.
It is crucial to select lag bolts with a sufficient load capacity to prevent failure or damage.
You can choose the right lag bolts that will provide a secure and reliable connection for your project. Remember to consult with professionals or experts if you have any doubts or specific requirements.
Best Screws for Stud Mounting
Application
Best Screw Type
Drywall
Drywall screws
Heavy-duty
Lag screws
All-purpose
Wood screws
Hollow walls
Toggle bolts
Concrete
Concrete screws
The best screws for stud mounting depend on the application, but some common types include:
Drywall screws: These screws are designed to be used with drywall, and they have a fine thread that will not damage the drywall.
Lag screws: These screws are designed for heavy-duty applications, and they have a thick shank that will provide strong holding power.
Wood screws: These screws are a good all-purpose choice for stud mounting, and they can be used with a variety of materials, including wood, plastic, and metal.
Toggle bolts: These screws are used to fasten objects to hollow walls, and they have a toggle that expands behind the wall to provide holding power.
Concrete screws: These screws are designed to be used with concrete, and they have a sharp point that will easily penetrate the concrete.
Correct Way to Install Lag Bolts in Studs
Hope now you know why you need to install the bolt in studs. By the way, you might also wonder, how to install lag bolts into wall?
Well, it’s the same as installing lag bolts in studs. You just need to follow 4 easy steps. These include aligning and camping the materials, drilling pilot holes and countersink holes, etc.
But before all that, make sure you gather some necessary tools. These are-
Drill Machine
Clamp
Lag Bolt
Stud
Tape
2 large pieces of lumber
Once you have these, you can start the process.
Step 1: Align & Clamp Your Materials Together
First, clamp together two pieces of lumber or any other materials. Measure the width of those materials. Then choose a lag bolt. It should be ¼ inch shorter than the total width.
After that, take a marker or pencil. Because you have to make the location of the pilot holes.
Step 2: Start Drilling Pilot Holes
Hopefully, you have a drill bit because you need it now. Make sure the bit is a bit smaller than lag screws’ diameter. This ensures that the threads of the lag bolts have enough material to bond to.
Now, drill through both materials. The depth should be equivalent to the length of the lag bolts. Then tape your drill bit.
This way you can mark the preferred hole depth. Plus you won’t drill all the way through.
Now, your drill bit might not be long enough while you’re connecting the two big pieces of lumber. For this, it gets hard to reach the appropriate hole depth this way.
Unclamp the two pieces in this scenario. Then drill through your second piece in the similar way as the first.
Step 3: Drill The Countersink Hole
There is only a way to identify the heads of lag bolts and wood screws. And the way is- lag bolts possess big hex heads. This head protrudes from the material when they are attached.
In some cases, protruding lag bolt heads on a flat deck can be dangerous. So, the solution is to drill countersink holes in the material to disguise the bolt head.
Now, take a big spade drill bit to create a countersink hole in the pre-drilled pilot holes. Make sure you’re drilling slightly larger holes than the lag bolt head’s diameter. This will allow your socket enough space for fastening the bolt flush with the material.
You can even use other big diameter bits in case a spade drill bit isn’t available. Now, just use tape and mark the area you set the countersink hole on the bit.
Step 4: Ratchet in Lag Bolts
In this step, use a ratcheting socket wrench for tightening your lag bolts. Keep tightening till the bolts are flush with your material.
You can also go for a powered drill if you have the correct bit. If you’re taking this path, take it slowly and steadily.
Overtightening the bolt might cause it to snap inside the material. This, afterward, will leave you with a serious headache.
Finally, remove the clamps and that’s it. You have a solid-as-rock fastening that will last for long.
Through Bolts Vs Lag Bolts
Aspect
Through Bolts
Lag Bolts
Purpose
Used for heavy-duty structural
Used for securing wood to wood or wood
applications where high strength is
to metal applications
required
Installation
Require drilling through the entire
Installed by pre-drilling a pilot hole
material and tightening the nut and
and then screwing into the material
washer on the opposite side
Strength
Generally offer higher strength due
Provide good holding power, especially
to their design and construction
in wood applications
Material
Typically made of steel, stainless
Available in various materials like
steel, or other alloys
steel, stainless steel, or brass
Application
Commonly used in construction,
Often used in woodworking, furniture,
bridges, heavy machinery, and
framing, and other wood-to-wood or
structural applications
wood-to-metal connections
Size Range
Available in a wide range of sizes
Come in various lengths and diameters
and lengths
Use with Washers
Often used with washers to evenly
Can be used with washers for better
distribute pressure and prevent
distribution of pressure and to prevent
damage to the material
damage to the material
Removal and
Removal involves unfastening the nut
Removal requires unscrewing the lag
Replacement
and disassembling the assembly
bolt from the material
When it comes to stud mounting, both through bolts and lag bolts are commonly used. Through bolts provide a stronger and more secure connection, as they pass completely through the stud.
On the other hand, lag bolts are easier to install and can still provide sufficient strength for many applications. The choice between the two depends on the specific requirements of your project.
Can You Use Romex in Metal Studs?
The answer to whether you can use Romex in metal studs is yes, you can. Romex is suitable for use in metal studs as long as it meets the necessary electrical codes and requirements. However, there are a few considerations to keep in mind.
Firstly, it is important to ensure that the Romex cable is properly secured and protected within the metal studs. This can be done by using appropriate cable staples or clamps to secure the cable at regular intervals. This helps to prevent any damage to the cable and ensures a safe installation.
Secondly, it is crucial to follow the electrical codes and guidelines for routing and protecting the Romex cable. This includes avoiding sharp bends or kinks in the cable, maintaining proper clearance from other electrical components, and using appropriate connectors and fittings.
Lastly, it is recommended to consult with a licensed electrician or refer to the local electrical codes and regulations to ensure compliance and safety when installing Romex in metal studs.
Can You Use Drywall Screws in Metal Studs?
Drywall screws are not recommended for use in metal studs. While they may seem like a convenient option, drywall screws are not designed to provide the necessary strength and support for attaching heavy objects to metal studs.
It is best to use lag bolts or other specialized screws specifically designed for metal studs to ensure a secure and safe installation.
Can You Use Toggle bolts in Metal Studs?
Toggle bolts are not recommended for use in metal studs. Toggle bolts rely on the thickness of the wall material to provide support, but metal studs are typically thinner than wood studs.
This can result in a weak and unstable installation. It is best to use lag bolts or other specialized screws designed for metal studs for a secure and reliable mounting solution.
Can You Use Wood screws in Metal Studs?
Wood screws are not recommended for use in metal studs. Metal studs are made of thin gauge steel, which can easily strip or deform when wood screws are inserted.
This can result in a weak and unreliable installation. It is best to use specialized screws designed for metal studs to ensure a secure and durable mounting solution.
Can You Use Wood blocking in Metal Studs?
Wood blocking, also known as wood bridging, is commonly used in construction to provide additional support and stability to structures.
It involves installing short pieces of lumber between metal studs to reinforce the framing. However, when it comes to using wood blocking in metal studs, there are a few considerations to keep in mind.
Firstly, it is important to note that wood blocking is typically used in conjunction with wood studs, not metal studs. Metal studs are designed to be lightweight and do not have the same structural properties as wood studs.
Therefore, using wood blocking in metal studs may not provide the desired level of support and stability.
Additionally, using wood blocking in metal studs can create potential issues with electrical wiring and plumbing. Metal studs often have pre-punched holes for running wires and pipes, which may not align with the wood blocking.
This can make it difficult to properly route and secure electrical and plumbing systems within the wall.
Related Questions
How far should the lag screw go into the stud?
The general rule of thumb is that the screw should enter at least half the thickness of the stud. For instance, using a 5 inches long stud for a 10 inches thick stud should be more than adequate.
How do you attach a lag bolt to wood?
Align and clamp the wood pieces. Then drill a pilot hole smaller than the diameter of your bolt. Use a ratchet to tighten the bolt. Finally, remove the clamps.
Should you drill pilot holes for lag bolts?
Since lag bolts have a larger diameter, they require pilot holes before installation. This eases the installation and ensures that the heads don't break when torque is applied.
How much weight can a lag bolt in a stud hold?
Different sizes of lag bolts can carry more weight than a 100-pound screw placed into the same stud. On a 5/16-inch lag bolt, up to 100 pounds of pressure per inch can be applied. Also, a 3/8-inch lag bolt can take up to 200 pounds per inch. Try to keep in mind, the smaller the lag bolt is, the stronger it is.
How to make a small bolt fit into a larger hole?
To make a small bolt fit into a larger hole, you can use a bushing or a washer to fill the gap, ensuring a secure fit. Alternatively, you can use a nut on the opposite side to secure the bolt in place.
How to remove broken bolt without extractor?
To remove a broken bolt without an extractor, try using penetrating oil to loosen it, then grip the bolt with locking pliers and carefully turn it counterclockwise until it comes out. If that fails, weld a nut onto the exposed end of the bolt and use a wrench to remove it.
How to remove a seized bolt with no head?
To remove a seized bolt with no head, apply penetrating oil, heat the surrounding area, and use a bolt extractor or a left-hand drill bit to remove the bolt by drilling into its center.
We believe, now you’ve got a better knowledge about how to install lag bolts in studs. Hopefully, you’ll be able to easily do the task by following the steps.
I'm a woodwork enthusiast and have loved to do DIY projects since my teenage. Till then, I have learned the 'Art of Wood' to rejuvenate my home interior, plumbing, and fixing. My blog woodpander.com leads information, for woodworking interested guys or just curious to know about woodworks.