Polyurethane finish turning uneven is a really common problem. This issue affects your furniture’s appearance, which isn’t welcome at all. But doing nothing won’t solve your issue.
So, how to fix an uneven polyurethane finish properly?
First, use fine-grit sandpaper to sand the uneven finish. Don’t try to sand aggressively. This may sand through the stain which will cause it to re-stain the area. Then take a clean cloth to wipe away any dust or dirt. Lastly, with a paintbrush apply a polyurethane coat to your sanded surface. The coat should be thin and even.
This is just a preview. We’ve guided you with a complete step-by-step process to fix the uneven polyurethane finish.
So, without waiting, let’s start working, shall we?
How To Fix Uneven Polyurethane Finish
Polyurethane is a synthetic resin-based varnish. This is used for finishing floors, cabinets, and other work.
These coat surfaces protect the materials from scratch and help to resist water damage. Polyurethane improves the durability of wood furniture. At the same time, it gives the wood or other material a glossy, smooth finish.
So, if the finish isn’t even, you’re bound to get frustrated. But you can fix the uneven polyurethane finish with our help. But before that, you have to gather some tools-
Hand gloves
Orbital sander
6-mil plastic sheeting
Polyurethane
240 grit Sandpaper
Synthetic sanding pads
Have you gathered the tools? Well if you have these with you, you can start the work-
Step 1: Sanding the Surface
First, prepare your fine-grit sandpaper. Start with sanding the surface with the help of that fine-grit sandpaper.
Now, do you want to know how to fix uneven Polyurethane finish on furniture? Well, even if that’s the case, this step is helpful.
So, let’s continue sanding the surface. Take square-sized foam (preferably styrofoam) and cover that with sandpaper. This will allow your hand proper space for moving freely.
Now, hold both your scrub and sandpaper. Keep the sandpaper facing the surface and start sanding the wood surface. Draw the foam back and forth to knock off the dust bumps.
By the way, keep in mind, sanding roughly might damage your wood finish. To be fair, you might sand through the stain. In this case, you need to re-stain the area.
So, try to not push any harder and try to sand firmly.
Step 2: Cleaning the Surface
After the sanding is done, you need to clean the wood surface. So, wipe away all the sanding dust and dirt with a cloth (preferably a microfibre cloth).
Wipe it dry at first with any microfibre cloth. Keep the water away so that you leave no spots after rubbing the surface.
After that, use mineral spirit or dish wash cleaner to clean the sticky spots if needed. Rub over the spots and clean the surface with a dry cloth again.
Make sure the surface is clean before you apply a polyurethane finish. This process keeps away specks of dust from getting trapped in the finish coat.
Step 3: Apply Polyurethane Finish
Now, we’re on the verge to apply our first coat of polyurethane finish. So, take a soft brush and put 3 tablespoons of polyurethane in it. Rub it all over the wood surface steadily. Make sure you don’t haste or push yourself hard.
There is another alternative option to brush. You can use a rubbing pad and random orbit sander to polish the surface.
Just put 3-4 tbsp of polyurethane to the pad and fit it with a random orbit sander. Pressing the rubbing pad to the surface, let the orbit start buffing all over the surface. Also, keep the speed of the orbit sander at a medium level.
This process will smoothen the finish on your surface even more. Now, let the first coat dry completely to check on its evenness.
If your coat seems to be thicker than you wanted, sand the surface. Then reapply the finish. And if the coat is too thin, apply additional coats until the surface is even.
So, this was the way to fix your uneven polyurethane finish!
How To Fix Polyurethane Mistakes? 15 Real Methods
Bubbles in Polyurethane Finish
Bubbles in polyurethane finish can be a frustrating issue to deal with, but understanding the causes and knowing how to fix them can help you achieve a smooth and flawless finish.
What Causes Bubbles In Polyurethane?
Shaking The Polyurethane Can: When you shake the can vigorously, it introduces air bubbles into the polyurethane, which can transfer onto the surface during application.
Wrong Application Method: Applying polyurethane too quickly or with excessive brush strokes can create air bubbles.
Wiping The Brush With The Side Of The Polyurethane Can: This can introduce dust or debris into the polyurethane, leading to bubbles.
Dirty Or Dusty Surface And Brush Preparation: If the surface or brush is not properly cleaned before application, it can trap dirt or dust particles that cause bubbles.
Not Using The Correct Brush Type: Using a brush with bristles that are too stiff or too soft can result in uneven application and the formation of bubbles.
How to Fix Polyurethane Bubbles?
Stir The Polyurethane Can Without Shaking: Instead of shaking the can, gently stir the polyurethane to minimize the introduction of air bubbles.
Clean The Surface Well Before Application: Ensure that the surface is clean and free from dust or debris before applying the polyurethane.
Apply Thin Coats: Applying thin coats of polyurethane allows for better control and reduces the likelihood of bubbles forming.
Tap On Bubbles Before It Dries: If you notice bubbles forming during application, gently tap them with a brush or a toothpick to release the trapped air.
Sand The Polyurethane Coats Once They’re Dried: After the polyurethane has dried, lightly sand the surface to remove any remaining bubbles and achieve a smooth finish.
Puddles in polyurethane finish
Puddles in polyurethane finish can be a frustrating issue that can ruin the appearance of your project. Understanding the causes and knowing how to fix them is essential for achieving a smooth and flawless finish.
Causes for Puddles in Polyurethane Finish
Not Letting Polyurethane Coats Dry Well Between Coats: Applying a new coat of polyurethane before the previous coat has fully dried can result in puddles. The wet polyurethane can mix with the new coat, creating uneven and thick areas.
Application Of Thick Layers: Applying polyurethane in thick layers can lead to puddles. The excess polyurethane does not have enough time to level out and can pool in certain areas, creating puddles.
How to Fix Polyurethane Puddles:
Wipe With Rag-Soaked Mineral Spirits: If you notice puddles in the polyurethane finish, you can try wiping the affected area with a rag soaked in mineral spirits. This can help to remove the excess polyurethane and even out the surface.
Sand And Start Over: If the puddles are too severe to be fixed with wiping, you may need to sand down the entire surface and start the polyurethane application process again. This will ensure a smooth and even finish.
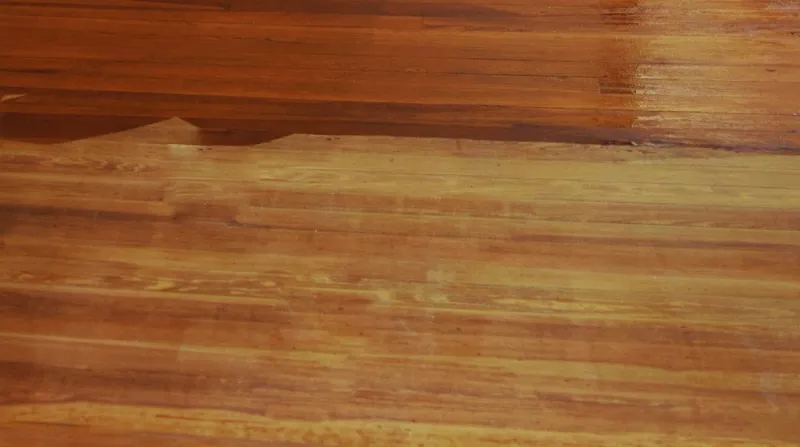
Uneven Polyurethane Finish
An uneven polyurethane finish can be a frustrating problem that can detract from the overall appearance of your project.
It can leave your surface looking blotchy, streaky, or with visible variations in sheen.
Understanding the causes of an uneven finish and knowing how to fix it is crucial for achieving a smooth and professional result.
Causes For Uneven Polyurethane Finish
One of the main causes of an uneven polyurethane finish is improper sanding of the surface before applying the polyurethane.
If the surface is not sanded evenly or if there are rough patches, the polyurethane will not adhere properly, resulting in an uneven finish. Another cause can be applying the polyurethane too thickly or unevenly.
This can lead to an uneven distribution of the product, causing variations in the final appearance.
How to Fix Uneven Polyurethane Finish?
To fix an uneven polyurethane finish, follow these steps:
Sand the Uneven Finish: Start by sanding the surface using a fine-grit sandpaper. Focus on the areas that are uneven or have imperfections. Sanding will help to level the surface and remove any rough patches. Be sure to sand evenly and gently to avoid damaging the surrounding finish.
Clean The Surface: After sanding, clean the surface thoroughly to remove any dust or debris. Use a tack cloth or a lint-free cloth dampened with mineral spirits to wipe away any residue. This will ensure a clean surface for the next step.
Apply Polyurethane Evenly: When applying the polyurethane, make sure to do so evenly and in thin coats. Use a high-quality brush or applicator pad to achieve a smooth and even application. Avoid applying too much polyurethane at once, as this can lead to pooling and an uneven finish. Allow each coat to dry completely before applying the next one.
Separating Issue in Polyurethane Finish
Causes For Layer Separation In Polyurethane Finish
Layer separation in polyurethane finish can occur due to several reasons.
One common cause is improper surface preparation, such as not sanding the existing surface before applying the finish.
Another cause can be inadequate cleaning of the surface, which can lead to poor adhesion between the layers of polyurethane. Additionally, using an incompatible or low-quality polyurethane product can also result in layer separation.
How to Fix Separation of Polyurethane Finish?
To fix layer separation in polyurethane finish, follow these steps:
Sand the Existing Surface: Start by sanding the affected area to remove the separated layers and create a smooth surface.
Clean the Surface: Thoroughly clean the sanded surface to remove any dust, dirt, or debris that could affect the adhesion of the new polyurethane layer.
Apply Polyurethane Finish: Apply a new layer of polyurethane finish, ensuring even coverage and following the manufacturer’s instructions for drying and curing times.
Discoloration of Polyurethane
Discoloration of polyurethane finish can be a frustrating problem, as it can significantly affect the appearance of your project. Understanding the causes of discoloration and knowing how to fix it is essential for achieving a beautiful and consistent finish.
Causes For Discoloration Of Polyurethane Finish
Discoloration of polyurethane finish can occur due to various factors. One common cause is improper mixing of the polyurethane product, which can result in uneven color distribution.
Another cause can be the presence of contaminants on the surface, such as dust or dirt, that can affect the clarity and color of the finish. Additionally, exposure to sunlight or UV rays can cause the polyurethane to yellow over time.
How to Fix Discoloration of Polyurethane?
To fix discoloration of polyurethane, consider the following steps:
Sand the Surface: Start by sanding the discolored area to remove the affected layer of polyurethane.
Clean the Surface: Thoroughly clean the sanded surface to remove any contaminants that could affect the new finish.
Apply a New Coat: Apply a fresh coat of polyurethane, ensuring even coverage and following the manufacturer’s instructions for drying and curing times.
Surface Roughness of Polyurethane Finish
Surface Roughness of Polyurethane Finish can be a frustrating issue that affects the overall appearance and feel of your project.
There are several factors that can contribute to surface roughness, including insufficient preparation, contaminated product, and poor sanding between coats.
Insufficient Preparation: One of the main causes of surface roughness in a polyurethane finish is insufficient preparation. If the surface is not properly sanded or cleaned before applying the polyurethane, it can result in a rough and uneven finish.
To avoid this issue, make sure to thoroughly sand the surface using a fine-grit sandpaper. This will help to remove any imperfections and create a smooth base for the polyurethane.
Additionally, clean the surface thoroughly to remove any dust or debris that could affect the finish.
Contaminated Product: Another cause of surface roughness is using a contaminated polyurethane product. Contaminants such as dust, dirt, or dried particles can get mixed into the polyurethane, leading to a rough finish.
To prevent this, always make sure to use a clean container and stir the polyurethane thoroughly before application.
Additionally, strain the polyurethane through a fine-mesh strainer to remove any potential contaminants.
Poor Sanding Between Coats: Poor sanding between coats can also result in a rough polyurethane finish. If the previous coat is not properly sanded before applying the next one, it can create a rough and uneven surface.
To fix this issue, make sure to sand the previous coat using a fine-grit sandpaper before applying the next coat. This will help to create a smooth and even surface.
How to Fix Surface Roughness of Polyurethane Finish?
To fix surface roughness of a polyurethane finish, follow these steps:
Sand the Surface: Start by sanding the rough areas using a fine-grit sandpaper. Sand gently and evenly to avoid damaging the surrounding finish.
Clean the Surface: After sanding, clean the surface thoroughly to remove any dust or debris. Use a tack cloth or a lint-free cloth dampened with mineral spirits to wipe away any residue.
Apply a New Coat: Once the surface is clean, apply a new coat of polyurethane. Make sure to apply the polyurethane in thin and even coats, allowing each coat to dry completely before applying the next one.
Orange Peel Effect
The orange peel effect in a polyurethane finish refers to a textured surface that resembles the skin of an orange.
This can occur due to various reasons, such as improper application technique, incorrect viscosity of the polyurethane, or environmental factors like temperature and humidity. To fix the orange peel effect, follow these steps:
Sand the Surface: Start by sanding the textured areas with fine-grit sandpaper to smooth out the surface.
Clean the Surface: Remove any dust or debris from the sanded areas to ensure a clean surface.
Thin the Polyurethane: If the polyurethane is too thick, thin it according to the manufacturer’s instructions to improve flow and leveling.
Apply Thin Coats: Apply thin, even coats of polyurethane, allowing each coat to dry completely before applying the next.
Sand Between Coats: Lightly sand between coats to promote adhesion and smooth out any imperfections.
By following these steps and using the correct application techniques, you can achieve a smooth and flawless polyurethane finish, free from the orange peel effect.
Streaking Polyurethane Finish
Streaking in a polyurethane finish can be frustrating, as it creates uneven lines or streaks on the surface, detracting from the desired smooth and flawless finish.
There are several causes for streaks in a polyurethane finish that you should be aware of.
Causes For Streaks In Polyurethane Finish
One common cause is improper application technique. If you apply the polyurethane too quickly or with too much pressure, it can result in streaks. Additionally, using a low-quality brush or applicator can also contribute to streaking.
How to Fix Streaking of Polyurethane Finish?
To fix streaks in a polyurethane finish, follow these steps:
Sand the Surface: Lightly sand the streaked areas with fine-grit sandpaper to remove the streaks and create a smooth surface.
Clean the Surface: Remove any dust or debris from the sanded areas to ensure a clean surface.
Apply Thin Coats: Apply thin, even coats of polyurethane, using the correct brushing technique and avoiding overbrushing.
Sand Between Coats: Lightly sand between coats to promote adhesion and smooth out any imperfections.
By addressing the causes of streaking and following these steps, you can achieve a streak-free polyurethane finish that enhances the beauty of your project.
Alligator Skin Polyurethane Finish
Alligator skin in a polyurethane finish refers to a textured, bumpy appearance that resembles the skin of an alligator.
This issue can occur due to several reasons, and it is important to understand the causes in order to effectively fix it.
Causes For Alligator Skin In Polyurethane Finish
Thick Application: Applying polyurethane in thick coats can lead to alligator skin. It is important to apply thin, even coats to allow for proper drying and curing.
Inadequate Drying Time: Not allowing sufficient drying time between coats can result in alligator skin. Follow the manufacturer’s instructions for drying times and ensure each coat is fully dry before applying the next.
High Temperature and Humidity: Applying polyurethane in high temperature and humidity conditions can cause the finish to dry too quickly, leading to alligator skin. Choose a suitable environment for application and avoid extreme conditions.
Incorrect Mixing Ratio: Improperly mixing the polyurethane components can cause alligator skin. Follow the manufacturer’s instructions for the correct mixing ratio to ensure proper curing.
How to Fix Alligator Skin Polyurethane Finish?
To fix alligator skin in a polyurethane finish, follow these steps:
Sand the Surface: Lightly sand the affected areas with fine-grit sandpaper to remove the alligator skin texture.
Clean the Surface: Remove any dust or debris from the sanded areas to ensure a clean surface.
Apply Thin Coats: Apply thin, even coats of polyurethane, following the correct mixing ratio and allowing adequate drying time between coats.
Sand Between Coats: Lightly sand between coats to promote adhesion and smooth out any imperfections.
By addressing the causes of alligator skin and following these steps, you can achieve a smooth and flawless polyurethane finish for your project. Remember to always follow the manufacturer’s instructions and use proper application techniques to avoid this issue.
Cratering Polyurethane Finish
Cratering in a polyurethane finish can be frustrating, but there are ways to fix it. One common cause of cratering is contamination on the surface, such as dust or debris.
To fix this issue, start by sanding the affected area lightly with fine-grit sandpaper. Then, clean the surface thoroughly to remove any contaminants.
Next, apply a thin coat of polyurethane, making sure to follow the manufacturer’s instructions for drying time. If the issue persists, you may need to strip the entire finish and start over.
Remember to always work in a clean environment and use proper application techniques to prevent cratering.
Cloudy Polyurethane Finish
Cloudy polyurethane finish can be a frustrating issue, but there are ways to fix it.
One common cause of cloudiness is improper application or mixing of the polyurethane.
To fix this issue, start by lightly sanding the affected area with fine-grit sandpaper to remove the cloudy layer. Then, clean the surface thoroughly to remove any dust or debris.
Next, apply a new coat of polyurethane, making sure to follow the manufacturer’s instructions for drying time and proper application techniques.
This should help to restore the clarity and shine of the finish. Remember to work in a clean environment to avoid introducing new contaminants.
Scratches On Polyurethane Finish
Scratches on a polyurethane finish can be unsightly, but they can be fixed with a few simple steps. Here’s how to repair scratches on a polyurethane finish:
Identify the scratches: Start by examining the surface to identify the scratches. Some scratches may be shallow and only affect the top layer of the finish, while others may be deeper and require more extensive repair.
Sand the scratched areas: Once you have identified the scratches, use fine-grit sandpaper to gently sand the affected areas. Sand in the direction of the wood grain to avoid further damage. This will help to smooth out the scratches and prepare the surface for the next step.
Clean the area: After sanding, clean the area thoroughly to remove any dust or debris. Use a soft cloth or a tack cloth to ensure that the surface is clean and free from any particles that could interfere with the new coat of polyurethane.
Apply a new polyurethane coat: Once the area is clean and dry, apply a new coat of polyurethane to the scratched areas. Follow the manufacturer’s instructions for drying time and application techniques.
This will help to blend the repaired areas with the rest of the finish and restore the smooth appearance.
By following these steps, you can effectively fix scratches on a polyurethane finish and restore the beauty of your wood surface. Remember to work carefully and patiently to achieve the best results.
Blushing on Polyurethane Finish
Blushing on a polyurethane finish can be frustrating, but understanding the causes and knowing how to fix it can help you achieve a flawless result. Here are the causes for blushes in a polyurethane finish and how to fix them:
Humidity: High humidity levels can cause moisture to become trapped in the polyurethane, resulting in a cloudy or milky appearance.
To fix this, wait for a day with lower humidity levels before applying the polyurethane. Alternatively, you can use a dehumidifier or fan to reduce the moisture in the air.
Temperature: Applying polyurethane in extremely cold or hot temperatures can lead to blushing. To prevent this, make sure the temperature is within the recommended range specified by the manufacturer. If blushing occurs, lightly sand the affected area and reapply the polyurethane in more suitable conditions.
Improper ventilation: Insufficient ventilation during the application and drying process can cause blushing. Ensure that the area is well-ventilated by opening windows or using fans.
If blushing occurs, lightly sand the affected area and reapply the polyurethane in a properly ventilated space.
Contaminated tools or surfaces: Dust, dirt, or other contaminants on the surface or tools can cause blushing.
Clean the surface thoroughly before applying the polyurethane and use clean tools. If blushing occurs, lightly sand the affected area and reapply the polyurethane with clean tools.
By addressing these causes and following the appropriate steps, you can effectively fix blushing on a polyurethane finish and achieve a smooth, professional result. Remember to work in a suitable environment and maintain cleanliness throughout the process.
Polyurethane Runs
Polyurethane runs can be a frustrating issue when applying a finish, but there are ways to fix them. To address polyurethane runs, start by allowing the finish to dry completely.
Once dry, lightly sand the affected area using fine-grit sandpaper. Be careful not to sand too aggressively, as this can damage the surrounding finish. After sanding, wipe away any dust with a clean cloth.
Next, apply a thin coat of polyurethane to the entire surface, feathering it out to blend with the surrounding area. Allow the finish to dry completely before applying additional coats if needed.
By following these steps, you can effectively fix polyurethane runs and achieve a smooth, professional finish.
Trapping Insects and Dust in Polyurethane Finish
Trapping insects and dust in a polyurethane finish can be a frustrating problem, but there are solutions to fix it. When you notice insects or dust trapped in the finish, it’s important to act quickly to prevent further damage.
First, allow the polyurethane finish to dry completely. Once dry, lightly sand the affected area using fine-grit sandpaper.
This will help to remove the trapped insects and dust without damaging the surrounding finish. Be sure to wipe away any dust with a clean cloth after sanding.
Next, apply a thin coat of polyurethane to the entire surface, making sure to feather it out to blend with the surrounding area. This will help to create a smooth and even finish. Allow the coat to dry completely before applying additional coats if necessary.
To prevent insects and dust from getting trapped in the future, make sure to work in a clean and dust-free environment. Cover the work area with a dust sheet or use a dust extraction system to minimize the risk of contamination.
Summary: How to Fix Polyurethane Mistakes?
To summarize, fixing polyurethane mistakes requires specific solutions for each problem. Whether it’s bubbles, puddles, unevenness, discoloration, or other issues, there are ways to address them. By following the appropriate steps, such as sanding, applying thin coats, and working in a clean environment, you can achieve a smooth and flawless polyurethane finish. Remember to always prioritize safety and ventilation when working with polyurethane.
Polyurethane Finish Problems
Polyurethane finish problems can be frustrating, but they are not uncommon. One common issue is the formation of bubbles in the finish.
These bubbles can be caused by improper application techniques or trapped air. Another problem is the presence of puddles in the finish, which can occur when too much polyurethane is applied in one area.
Unevenness in the finish is another issue that can arise, resulting in an inconsistent appearance.
It’s important to address these problems promptly to achieve a smooth and flawless polyurethane finish.
By following the right techniques and using the appropriate solutions, you can overcome these challenges and achieve professional-looking results.
How To Repair Damaged Polyurethane Finish?
To repair a damaged polyurethane finish, there are several steps you can take.
First, assess the extent of the damage. If it’s a small scratch or scuff, you can try using a fine-grit sandpaper to gently sand the affected area.
After sanding, clean the surface with a mild detergent and water to remove any dust or debris.
Next, apply a new coat of polyurethane using a brush or roller, making sure to feather the edges to blend it with the existing finish.
Allow the new coat to dry completely before applying additional coats if needed. For more severe damage, such as deep scratches or gouges, you may need to strip the entire finish and start fresh.
Use a chemical stripper to remove the old finish, then follow the same steps as mentioned earlier to apply a new coat of polyurethane.
Remember to always test any products or techniques in a small, inconspicuous area before applying them to the entire surface.
How To Fix Too Much Polyurethane?
To fix too much polyurethane on a surface, follow these step-by-step instructions. First, gather the necessary materials, including a scraper, sandpaper, mineral spirits, and a clean cloth. Begin by using the scraper to gently remove any excess polyurethane.
Be careful not to damage the underlying surface. Next, lightly sand the area with fine-grit sandpaper to smooth out any remaining polyurethane.
Wipe away the dust with a clean cloth. If the excess polyurethane is still visible, dampen a cloth with mineral spirits and gently rub the affected area.
This will help to dissolve and remove the excess polyurethane. Finally, wipe the surface clean with a damp cloth and allow it to dry completely. Repeat these steps if necessary until the desired result is achieved.
By following these steps, you can effectively fix the issue of too much polyurethane on your surface.
What Is The Best Way To Apply Polyurethane?
The best way to apply polyurethane is to follow a few key steps.
First, make sure the surface is clean and free of any dust or debris. Next, lightly sand the surface to create a smooth and even texture.
Then, apply the polyurethane using a high-quality brush or foam applicator, working in long, even strokes. Be sure to apply thin coats, allowing each coat to dry completely before applying the next.
This will help prevent drips and ensure a smooth finish. Finally, sand the surface lightly between coats to remove any imperfections.
By following these steps, you can achieve a professional-looking polyurethane finish.
How To Fix Cloudy Polyurethane?
To fix a cloudy polyurethane finish, there are a few steps you can take.
First, sand down the cloudy layer using fine-grit sandpaper. This will help to remove the cloudiness and create a smooth surface. Be sure to sand gently and evenly to avoid creating any additional damage.
Once the cloudy layer has been sanded down, you can apply a new coat of polyurethane. Make sure to choose a high-quality polyurethane product and apply it according to the manufacturer’s instructions. Apply thin, even coats and allow each coat to dry completely before applying the next.
After the new coat of polyurethane has dried, you can further improve the finish by sanding and polishing the surface. Use a fine-grit sandpaper to gently sand the surface, then follow up with a polishing compound to restore the shine and smoothness.
By following these steps, you can effectively fix a cloudy polyurethane finish and restore the beauty of your project.
What Happens If You Recoat Polyurethane Too Soon?
Recoating polyurethane too soon can lead to poor adhesion, resulting in a weaker finish. It can also cause bubbles or blisters to form between the layers, requiring sanding and refinishing.
Additionally, an uneven or streaky finish may occur if the new coat doesn’t level properly. To avoid these issues, follow the manufacturer’s instructions and allow each coat to fully cure before recoating.
How To Fix Polyurethane Not Adhering?
To fix polyurethane not adhering properly, follow these step-by-step instructions.
First, ensure that the surface is clean and free from any dust or debris. Use a mild detergent and water to clean the area, and then allow it to dry completely.
Next, lightly sand the surface with fine-grit sandpaper to create a rough texture that will help the polyurethane adhere better. Wipe away any sanding dust with a clean cloth.
Apply a thin, even coat of polyurethane using a high-quality brush or applicator. Make sure to follow the manufacturer’s instructions for drying time between coats.
If the polyurethane still does not adhere properly, you may need to strip off the existing finish and start fresh. Use a paint stripper or sanding method to remove the old polyurethane, and then repeat the cleaning and sanding steps before applying a new coat.
How Do You Smooth Out Polyurethane Finish?
To achieve a smooth polyurethane finish, there are a few steps you can follow.
First, ensure that the polyurethane has fully dried according to the manufacturer’s instructions.
This is crucial because sanding too soon can ruin the finish. Once the polyurethane is dry, lightly sand the surface using fine-grit sandpaper. This will help to remove any imperfections, such as dust particles or brush strokes.
After sanding, wipe away any sanding dust with a clean cloth or tack cloth. This step is important to ensure a clean surface for the next coat of polyurethane. If you notice any rough areas or unevenness, you can repeat the sanding process until the surface feels smooth to the touch.
To further enhance the smoothness of the polyurethane finish, you can use a technique called “wet sanding.” Wet sanding involves using water or a lubricant, such as mineral spirits, to lubricate the sandpaper.
This helps to prevent clogging and allows for a smoother sanding process. Wet sanding can be particularly effective for removing any remaining imperfections and achieving a glass-like finish.
Remember to always sand in the direction of the wood grain and use light pressure to avoid damaging the surface. Once you have achieved the desired smoothness, wipe away any residue and apply additional coats of polyurethane as needed, following the manufacturer’s instructions.
Can You Touch Up Polyurethane?
To fix minor imperfections in a polyurethane finish, you can touch up the affected areas. Start by cleaning the surface with a mild detergent and water to remove any dirt or debris.
Then, lightly sand the damaged area using fine-grit sandpaper to smooth it out. After sanding, wipe away any dust and apply a thin coat of polyurethane using a brush or cloth. Allow it to dry completely before assessing the results.
If necessary, repeat the process until the touch-up blends seamlessly with the surrounding finish.
Remember to follow the manufacturer’s instructions and test the touch-up in an inconspicuous area first.
How to Fix Blotchy Polyurethane Finish?
Blotchy polyurethane finish can be frustrating, but there are ways to fix it. Start by sanding the affected area with fine-grit sandpaper to remove the unevenness.
Clean the surface thoroughly to remove any dust or debris. Apply a wood conditioner to help the polyurethane absorb more evenly.
Then, apply a thin coat of polyurethane using a brush or cloth, following the wood grain. Allow it to dry completely before assessing the results. If the blotchiness persists, you may need to strip the entire finish and start over.
Remember to test any products or techniques in an inconspicuous area first.
How Do You Buff Imperfections In Polyurethane?
To buff imperfections in polyurethane, start by sanding the surface with fine-grit sandpaper to smooth out any rough spots or bubbles.
Use a sanding block or orbital sander for larger areas.
After sanding, wipe away any dust with a clean cloth.
Next, apply a thin layer of polyurethane using a brush or foam applicator, following the wood grain. Allow it to dry completely.
Then, lightly sand the surface again with a higher grit sandpaper to remove any brush marks or unevenness.
Finally, use a soft cloth or buffing pad to buff the polyurethane in circular motions until it has a smooth, glossy finish.
Can I Put Another Coat Of Polyurethane Without Sanding?
While it is possible to apply another coat of polyurethane without sanding, there are a few things to keep in mind.
Before applying the new coat, make sure the previous one is fully cured and not tacky. Additionally, ensure that the surface is clean and free of any dust or debris.
Follow the manufacturer’s instructions for applying the new coat, using a brush or foam applicator.
However, be aware that adding multiple coats without sanding in between can result in a thicker finish, which may impact the appearance and durability.
For optimal results, it is recommended to follow the recommended sanding and recoating guidelines.
How Do You Remove Polyurethane Streaks?
To remove polyurethane streaks, start by lightly sanding the affected area using fine-grit sandpaper.
Then, wipe away the dust with a clean cloth.
Next, apply a thin layer of mineral spirits or paint thinner to the streaks and gently rub them with a soft cloth.
Finally, reapply a fresh coat of polyurethane for a smooth finish.
How To Fix Hardwood Floors Rough After Polyurethane?
Once the second coat is dry, lightly sand the surface again to smooth out any imperfections or rough areas. Use a fine-grit sandpaper and be gentle to avoid damaging the polyurethane finish.
After sanding, clean the surface once more to remove any dust or debris. Then, use a soft cloth or buffer to buff the surface, giving it a smooth and polished appearance.
By following these steps, you can effectively fix hardwood floors that are rough after applying polyurethane, restoring them to their original beauty and ensuring a durable and long-lasting finish.
What Does Vinegar Do To Polyurethane?
Vinegar is a versatile household ingredient that can be used for various purposes, but when it comes to polyurethane, it’s best to avoid using it.
Vinegar is acidic and can potentially damage the polyurethane finish. It may cause discoloration, dullness, or even strip away the protective layer. Instead, opt for mild soap and water to clean polyurethane surfaces.
If you’re looking for a natural alternative, consider using a mixture of water and vinegar in a 1:1 ratio, but be cautious and test it on a small, inconspicuous area first to ensure it doesn’t negatively affect the polyurethane finish.
Did I cover all you wanted to know about: How to Fix Polyurethane Mistakes?
Fixing polyurethane mistakes can be a daunting task, but with the right knowledge and techniques, you can achieve a flawless finish.
One common issue is the presence of bubbles in the polyurethane finish, caused by improper application or trapped air.
To fix this, lightly sand the area and apply a new coat. Puddles in the finish can be fixed by sanding and reapplying a thin coat. Uneven finish can be addressed by sanding and applying a new coat. With proper techniques and patience, you can achieve a professional result.
Bottom Line
Hopefully, now you’ve got some ideas about how to fix an uneven polyurethane finish. With the above instructions, you can easily perform the process.
If there’s anything bothering you, let us know.
That’s all. Good luck fixing the uneven polyurethane finish! Hope to see you soon!
Related Questions
What causes an uneven polyurethane finish?
An uneven polyurethane finish can be caused by a variety of factors, including incorrect application technique, poor surface preparation, or environmental conditions.
Can you touch up polyurethane?
Yes, a polyurethane-finished hardwood can be recoated. It takes to follow proper steps to have a perfect finish. Using a heavy floor buffer, you have to lightly sand with steel wool. Or, you can sand on a dull 120- to 150-grit abrasive screen with the buffer.
Can you fix an uneven polyurethane finish without sanding?
In most cases, it is necessary to sand the surface before fixing an uneven polyurethane finish.
Can you apply a new coat of polyurethane over an uneven finish?
It is possible to apply a new coat of polyurethane over an uneven finish, but it is important to sand the surface and follow the proper application technique.
Do you sand the final coat of polyurethane?
Yes, a 600 grit sandpaper can be used to gently sand the polyurethane's last coat. Sanding, on the other hand, is optional. If you sand your polyurethane finish, it may appear clouded or scuffed.
Are 2 coats of polyurethane enough?
It depends on the surface. If the surface needs to roughen up, we might need 2 coatings. This gives the surface better traction. It's the same for multiple coatings. Multiple coats make the Coating get thicker, tougher, and more glossy.
How to fix uneven Polyurethane Finish on floor?
First sweep the floor. Clean the floor with a mop soaked in water and white vinegar. Next, sand the floor with an abrasive pad or steel wood. Afterward, with the 5′′ to 3′′ brush, apply polyurethane to the edges of wood floors. You can add polyurethane to the center of the floor with a roller or bristle brush.
How do you fix an uneven polyurethane finish on wood floors?
To fix an uneven polyurethane finish on wood floors, sand the affected area and apply a new coat of polyurethane, following proper application technique.
How do you fix bubbles in polyurethane finish?
Bubbles in a polyurethane finish can be fixed by sanding the affected area and applying a new coat of polyurethane.
What is the best way to apply polyurethane to avoid an uneven finish?
To avoid an uneven polyurethane finish, make sure to apply the finish in thin, even coats, using the proper application technique.
I'm a woodwork enthusiast and have loved to do DIY projects since my teenage. Till then, I have learned the 'Art of Wood' to rejuvenate my home interior, plumbing, and fixing. My blog woodpander.com leads information, for woodworking interested guys or just curious to know about woodworks.


")