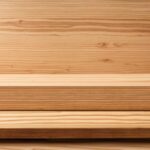
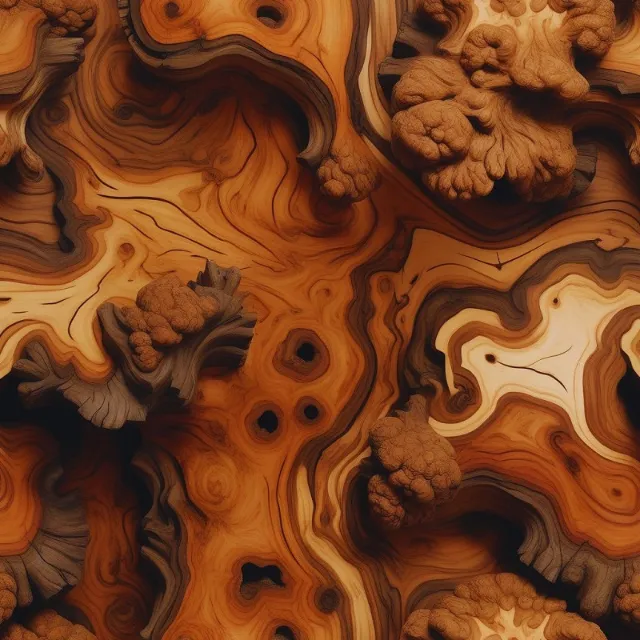
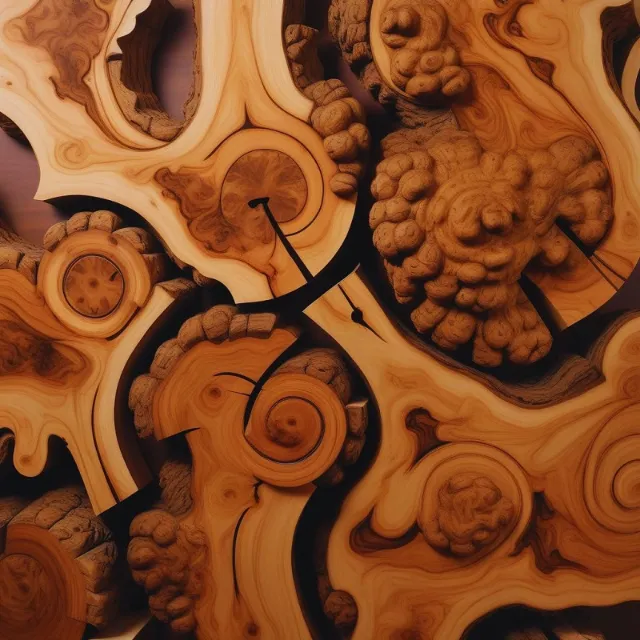
A burl is an attractive, superfluous growth on a tree. These valuable wood pieces can be used to make lots of things. For example, you can make veneers, furniture, artwork, bowls, and even wood watches with it.
Now, you might be wondering how to finish burl wood?
Finishing burl wood can be done only by following four steps. First, you have to do the sanding. Then oil the burl wood. After you’ve finished oiling the burl wood, build up successive coats. Lastly, remove the excess oil that has accumulated in the burl wood. This is how you can finish burl wood.
Now, these will not be enough for you. Therefore, we request you to read the step-by-step guide on finishing burl woods.
So, without further ado, let’s get into the details!
Types of Burl Wood
Burl wood comes in a variety of types, each with its own unique characteristics and beauty. Let’s explore some of the most popular types of burl wood that you can use for your woodworking projects.
Maple trees are known for their stunning burl wood. The intricate patterns and swirls in maple burl create a mesmerizing effect, making it a favorite among woodworkers. Its light color and smooth texture make it versatile for a wide range of projects.
Oak burl wood is another popular choice. With its strong and durable nature, oak burl is perfect for creating sturdy furniture pieces. The rich, dark tones and deep grain patterns add a touch of elegance to any project.
Elm burl wood is prized for its unique and irregular patterns. The swirling grain and contrasting colors make it a standout choice for decorative items like bowls and vases.
Redwoods are known for their massive size, but they also produce beautiful burl wood. The reddish-brown hues and intricate patterns make redwood burl highly sought after for creating statement pieces.
Walnut tree burl wood is highly prized for its rich, dark color and striking grain patterns. It is often used for creating high-end furniture and decorative items.
English walnut burl wood is similar to its American counterpart but has a slightly lighter color. It is often used for creating intricate carvings and veneers.
Sugar maple burl wood is characterized by its light color and delicate grain patterns. It is commonly used for creating small decorative items like jewelry boxes and picture frames.
Ohio Buckeye burl wood is known for its unique and eye-catching patterns. The light color and intricate swirls make it a popular choice for turning projects.
Birdseye maple is a rare and highly prized type of burl wood. It is characterized by small, circular patterns that resemble bird’s eyes. This unique pattern adds a touch of elegance to any woodworking project.
4 Steps Of How To Finish Burl Wood

Finishing your burl wood is important. This way your wood will be protected. Plus it’ll look much better too.
Now, these four steps will help you to finish the burl wood. Just follow the instructions to achieve your ultimate goal-
Step 1 of 4: Sanding The Burl Woods
The first step is to properly cut the burl. Now, continue to apply paint sealer. Keep sanding between layers of the wood. Until the surface is perfectly level and there are no visible imperfections. Be very careful about little cracks, you might not see them easily.
Now, apply wet sand with 400 grit between layers. Then, over the top, apply three or four coats of a gloss finish. By then, the finish should be rather appealing.
As a result, working your way through the grits up to 400 grit is adequate for most woods. Because normally the Woodblocks get sanded to 400 grit easily.
Step 2 of 4: Oil The Burl Wood
After the wood has been sanded to 400 grit, prepare it for oiling. Use an air compressor and an air nozzle to blow off any sanding dust. You can produce your own oil by combining-
- 1/3 Linseed
- 1/3 Varnish
- 1/3 Paint thinner
However, you may achieve similar results by purchasing a can of Danish oil. Once you have the oil, apply a generous coat of oil to the wood with a brush.
Then let it dry for about 15 or 20 minutes. Once dried, apply a second coat. Next, wait for approximately an hour before wiping it down with an old cloth.
Step 3 of 4: Build Up Successive Coating
Building up successive coating is the standard method for applying an oil finish. If you want a satisfactory result, this can take several days.
This allows you to forego the time-consuming process of applying a hand-rubbed oil finish.
Now, when you oil the wood, you may find some sanding marks you didn’t notice previously. As long as the scratches are not deep, the oiling should have fixed minor flaws. But if not, you would have to re-sand and re-oil the wood.
Step 4 of 4: Removing The Excess Oil In The Burl Wood
You can use the compressor and air nozzle after completing the preceding steps. These will blow away any excess oil that has accumulated, such as checks, voids, and open grain.
This step is critical so you have to be careful. Otherwise, the extra oil will flow out. As a result, the finish will be uneven.
First, you have to apply a top layer of lacquer without waiting for the oil to completely dry. It is entirely up to you whether or not to let the wood dry overnight.
When you build boxes. Then you just wash away any extra oil before proceeding to the lacquer phase. We prefer using aerosol for washing that extra oil.
These are the four effective steps you need to take to finish burl wood. Please let us know if you require any further support.
One of our articles –How To Fix Uneven Polyurethane Finish: 3 Easy Steps

How to Find Burl Wood
Finding burl wood for your woodworking projects can be an exciting and rewarding experience. Burl wood is highly sought after for its unique patterns and beauty. Here are some tips on how to find burl wood:
1. Local Wood Suppliers: Start by checking with local wood suppliers or specialty lumberyards. They may have a selection of burl wood available for purchase. Visit their stores or check their websites to see if they carry burl wood in stock.
2. Online Marketplaces: Online marketplaces like Etsy or eBay can be a great resource for finding burl wood. Many woodworkers and artisans sell their burl wood creations or raw burl wood pieces on these platforms. You can browse through the listings and find the perfect piece for your project.
3. Woodworking Forums and Groups: Joining online woodworking forums or social media groups can connect you with other woodworkers who may have burl wood for sale or can provide recommendations on where to find it. These communities are a valuable resource for sharing knowledge and connecting with fellow enthusiasts.
4. Local Tree Removal Services: Contact local tree removal services or arborists in your area. When they remove trees, they often come across burl wood. By reaching out to them, you may be able to acquire burl wood pieces that would otherwise go to waste.
5. Nature Walks and Hiking: If you enjoy spending time outdoors, take a nature walk or go hiking in areas known for their burl wood trees. Look for signs of burl wood on fallen or dead trees. Remember to obtain any necessary permits or permissions before collecting burl wood from public or private lands
How to Cut Burl Wood
Cutting burl wood requires careful planning and precision to ensure the best results for your woodworking project. Here are some steps to follow when cutting burl wood:
1. Prepare Your Tools: Before you begin cutting, make sure you have the right tools for the job. A bandsaw or a chainsaw with a fine-toothed blade is recommended for cutting burl wood. Additionally, have a sturdy workbench or sawhorses to secure the wood during the cutting process.
2. Mark Your Cuts: Use a pencil or chalk to mark the areas where you want to make your cuts. Take into consideration the unique patterns and features of the burl wood, and plan your cuts accordingly to highlight its natural beauty.
3. Secure the Wood: Place the burl wood securely on your workbench or sawhorses, ensuring that it is stable and won’t move during the cutting process. This will help you maintain control and accuracy while cutting.
4. Make the Cuts: Using your bandsaw or chainsaw, carefully follow the marked lines to make your cuts. Take your time and proceed slowly to avoid any mistakes or damage to the wood. It’s important to maintain a steady hand and let the tool do the work.
How to Clean Burl Wood
Cleaning burl wood is an important step in preserving its natural beauty and ensuring its longevity. Here are some tips on how to clean burl wood effectively:
Dusting: Start by gently dusting the surface of the burl wood with a soft, lint-free cloth or a feather duster. This will remove any loose dirt or debris without scratching the wood.
Mild Soap and Water: If the burl wood is particularly dirty or stained, you can use a mild soap and water solution to clean it. Mix a small amount of mild dish soap with warm water and dampen a soft cloth with the solution. Gently wipe the surface of the wood, being careful not to saturate it. Rinse the cloth with clean water and wipe away any soap residue.
Avoid Harsh Chemicals: It’s important to avoid using harsh chemicals or abrasive cleaners on burl wood, as they can damage the delicate surface. Stick to mild, non-abrasive cleaning solutions to protect the wood.
Drying: After cleaning, make sure to dry the burl wood thoroughly to prevent any moisture from seeping into the wood and causing damage. Use a clean, dry cloth to gently pat the wood dry, and allow it to air dry completely before placing any objects on it.
Oak Burl Wood Projects
Oak burl wood is a unique and highly sought-after material that can be used for a variety of woodworking projects. Its intricate patterns and rich colors make it a favorite among craftsmen and artisans. Here are some inspiring oak burl wood projects that you can try:
Coffee Table: Create a stunning centerpiece for your living room by crafting a coffee table from oak burl wood. The natural patterns and textures of the wood will add a touch of elegance to your space. The will guide you through the process of finishing the wood to bring out its natural beauty and protect it from wear and tear.
Bowl: Turn a piece of oak burl wood into a beautiful bowl. The irregular shape and unique grain patterns will make each bowl a one-of-a-kind piece. Use to ensure that your bowl is properly finished and sealed to prevent any damage or warping.
Wall Art: Use oak burl wood to create a striking piece of wall art. Whether you carve a sculpture or create a mosaic, the natural beauty of the wood will make a statement in any room. The “How To Finish Burl Wood?” will help you bring out the colors and patterns of the wood, making your wall art truly stand out.
Cutting Board: Craft a functional and beautiful cutting board from oak burl wood. The durable nature of the wood makes it perfect for this purpose, and the unique patterns will make your cutting board stand out. Follow to ensure that your cutting board is food-safe and properly finished.
Jewelry Box: Create a special place to store your jewelry by making a jewelry box from oak burl wood. The intricate patterns of the wood will add a touch of luxury to your collection. Use your jewelry box and keep it looking beautiful for years to come.
Tips for Achieving a Professional Finish
Achieving a professional finish when working with burl wood requires attention to detail and a systematic approach. Here are some detailed tips to help you achieve a stunning and polished result:
Surface Preparation:
Before applying any finish, ensure the burl wood surface is clean, dry, and free from any dust or debris. Check for imperfections such as knots, cracks, or voids, and fill them with wood filler. Allow the filler to dry completely before proceeding.
Sanding the Surface:
Sanding is a crucial step in achieving a smooth and even finish. Start with a coarser grit sandpaper (around 100 to 150) to remove any rough spots or uneven areas. Gradually move to finer grits (e.g., 220, 320, 400) for a smoother surface. Sanding helps the finish adhere better and ensures a flawless end result.
Choose the Right Finish:
Selecting the appropriate finish is essential for bringing out the beauty of burl wood. There are various types of finishes available, such as oil-based, lacquer, polyurethane, and shellac. Each finish has its unique properties, and the choice depends on the desired appearance and level of protection.
Test the Finish:
Before applying the finish to the entire piece of burl wood, perform a test on a small, inconspicuous area. This allows you to evaluate how the finish interacts with the wood and make any necessary adjustments before committing to the entire project.
Apply Thin Coats:
To achieve a professional finish, apply thin coats of the finish rather than thick layers. Thick coats can lead to drips, uneven surfaces, and longer drying times. Thin coats also allow the wood to breathe, reducing the risk of finish-related issues.
Sand Between Coats:
After each coat of finish has dried, lightly sand the surface with fine-grit sandpaper. Sanding between coats helps create a smooth and even finish while promoting better adhesion of subsequent layers.
Follow the Wood Grain:
When applying the finish, always follow the direction of the wood grain. This technique ensures an even application and minimizes the visibility of brush or spray strokes.
Mind the Drying Time:
Different finishes have varying drying times. Be patient and allow each coat to dry completely according to the manufacturer’s recommendations before applying the next layer.
Buffing for a Polished Look:
Once you have applied the final coat, consider buffing the surface with a soft cloth. Buffing enhances the sheen and adds a polished look to the finished burl wood.
Staining for Enhanced Patterns:
If you want to accentuate the natural patterns of the burl wood, consider using a wood stain before applying the finish. The stain can emphasize the swirling figures and colors, making them more pronounced and visually striking.
Cleanliness and Ventilation:
Work in a clean environment to avoid dust and debris settling on the wet finish. Additionally, ensure your workspace is well-ventilated to prevent inhaling fumes from the finish, especially if you’re using oil-based products.
Protective Gear:
Always wear appropriate protective gear, such as gloves and safety goggles, when handling finishes. Some finishes contain chemicals that can be harmful to the skin and eyes, so it’s essential to take precautions.
By following these detailed tips and paying close attention to each step, you can achieve a professional finish that showcases the natural beauty of burl wood while providing excellent protection and longevity for your woodworking projects.
Common Mistakes to Avoid
Avoiding common mistakes is crucial to achieving a flawless finish when working with burl wood. Here are some detailed tips on what to avoid during the finishing process:
Overapplying Finish:
One of the most common mistakes is applying too much finish at once. Thick coats can lead to drips, bubbles, and an uneven surface. Instead, apply thin, even coats and allow each layer to dry completely before adding more.
Skipping Surface Preparation:
Neglecting to properly prepare the burl wood surface is a major error. Failing to remove dust, dirt, or imperfections before applying the finish can result in a poor adhesion and an unsightly final appearance.
Inadequate Sanding:
Skipping or rushing through the sanding process can lead to rough and uneven surfaces. Take the time to sand the wood properly with progressively finer grits, ensuring a smooth and polished base for the finish.
Using the Wrong Finish:
Different types of burl wood may react differently to certain finishes. Using the wrong type of finish can lead to unsatisfactory results, such as poor adhesion, color mismatch, or a finish that doesn’t enhance the wood’s beauty.
Not Testing the Finish:
Failure to perform a test on a small area of the burl wood before applying the finish to the entire piece can be risky. Testing allows you to check compatibility, drying time, and the overall effect of the finish on the wood.
Ignoring Safety Precautions:
Working with finishes often involves chemicals that can be harmful to your skin, eyes, or respiratory system. Always wear appropriate safety gear, such as gloves and safety goggles, and work in a well-ventilated area.
Rushing the Drying Process:
Impatience can be detrimental to the finish. Rushing the drying process by applying new coats before the previous ones have fully dried can lead to tackiness, unevenness, or even ruining the finish.
Applying the Finish Against the Grain:
Applying the finish against the wood grain can result in streaks, brush marks, or uneven distribution. Always work with the grain to achieve a smooth and uniform finish.
Neglecting to Sand Between Coats:
Each coat of finish should be sanded lightly before applying the next. Skipping this step can result in rough patches and diminish the overall quality of the finish.
Using Contaminated Brushes or Tools:
Ensure that the brushes and tools you use are clean and free from any residue from previous projects. Contaminated tools can affect the finish and create imperfections.
Failing to Clean the Surface Properly:
After sanding, make sure to clean the wood surface thoroughly to remove any dust or debris before applying the finish. Otherwise, these particles can become trapped in the finish.
Applying the Finish in Poor Lighting:
Inadequate lighting can make it difficult to see imperfections or uneven application during the finishing process. Work in a well-lit area to ensure you achieve a professional result.
By being mindful of these common mistakes and taking the time to approach the finishing process with care and attention to detail, you can avoid unnecessary errors and achieve a stunning, professional finish on your burl wood projects.
Enhancing Burl Wood’s Natural Patterns
To enhance the natural patterns of burl wood, consider using a wood stain before applying the finish. The stain can highlight the swirling patterns, making them more pronounced and captivating.
Safety Precautions When Finishing Burl Wood
Safety should be a top priority when working with any finish. Always wear gloves and safety goggles to protect your skin and eyes from harmful chemicals. Work in a well-ventilated area to avoid inhaling fumes.
Bottom Line
These steps are little-known ways on how to finish burl wood. However, these are quite effective steps.
We hope we were able to assist you with the information you required. Now, it’s you who has to make a move and finish the burl wood.
Also, contact us if you have queries. We will always assist you in this matter. Good luck!
Related Questions
What is the best type of burl wood?
Redwood, oak, ash, maple, madrone, elm, and walnut are all common burl species. Mappa poplar burl, thuya, and imbuya are just a few of the exotics with popular burls.
Can You Stain Burl Wood?
Yes, burl can be stained. However, the darker the stain, the less visible the burl appears. There will be less contrast between light and dark wood in the grain. Therefore you can easily stain burl wood to make it more good-looking.
How do you sand a wood burl?
You can sand a wood burl by using a Flatmaster. The Flatmasters has sandpaper in it which will sand the wood burl and make it smooth. And then you can start finishing the wood burl.
How do you finish a burl veneer?
Here's what you should do, you have to apply sealer and keep sanding between layers. Until the surface is properly aligned and there are no visible faults. Apply 3 or 4 light "mist" coatings of your favorite sanding sealer. This is done to seal the veneer without spraying a wet coat through it.
How much burl wood is worth?
The majority of burl woods, particularly layered burl woods, are not highly valued. A block of bigger-eyed burl wood in good condition should fetch $25 to $200. And it also depends on the condition, size, and species. A burl wood as large as 8 feet in diameter, as well as numerous in the 4-5 foot range. These can be worth up to $500.
What is burl wood?
Burl wood is a type of wood that comes from a growth on a tree. The growth is usually caused by a fungal infection or other stress to the tree, which causes the grain of the wood to become distorted and twisted. Burl wood is highly prized for its unique and often beautiful appearance.
Why is finishing burl wood difficult?
Burl wood is difficult to finish because its irregular grain can cause the finish to be absorbed unevenly. This can result in a blotchy or uneven finish. Additionally, burl wood can be very porous, which can also affect the way the finish is absorbed.
How should I prepare the burl wood before applying the finish?
Before applying any finish, you should sand the burl wood to a smooth surface. This will help the finish absorb evenly. You may also want to use a wood conditioner to help the finish absorb more evenly. Be sure to wipe the wood clean of any sawdust or debris before applying the finish.
How many coats of finish should I apply to burl wood?
The best way to apply the finish to burl wood is with a brush. Be sure to apply the finish evenly and in thin coats. Allow each coat to dry completely before applying the next. If you see any bubbles or brush marks, you can lightly sand the surface before applying the next coat.